Water Cycle in a Bag
| Water Cycle Powerpoint |
|
Grade Level/Subject:
Big Ideas:
.
Rationale:
.
Common Core/Essential Standards:
Behavioral Objective and Essential Question
.
.
Prerequisite Knowledge/Skills:
Materials/Resources:
|
3rd Grade
Science- Water Cycle - What are the steps in the water cycle
- What does each step mean Students need to understand the water cycle so they will understand the importance of keeping our water clean. It will also be beneficial when learning bigger concepts in science in later years.
3.E.2.1: Compare Earth’s saltwater and freshwater features – Process
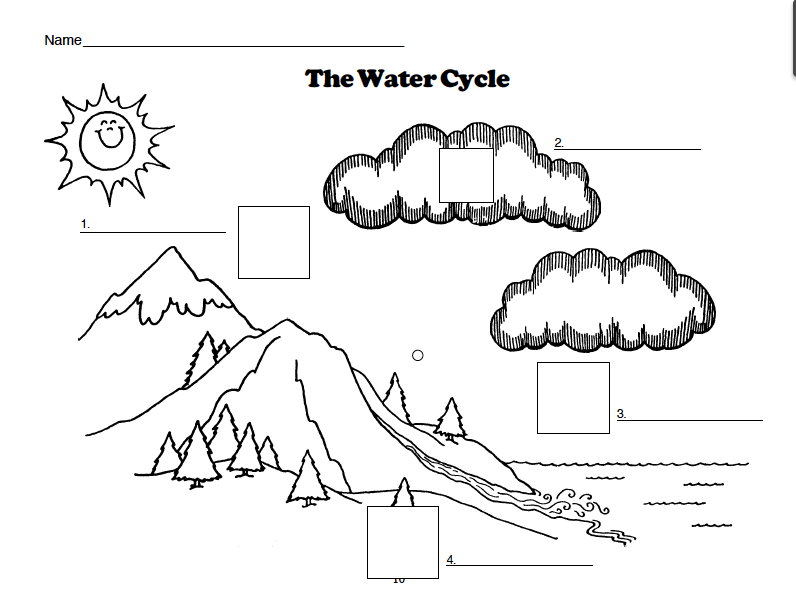
BO: Students will be able to write a story that follows one water droplet through the whole water cycle. Students will be able to use the terms: water cycle, precipitation, surface water, evaporation, and condensation properly in their story.
EQ: What are the steps to the water cycle - Importance of water
- How we keep water clean -What we use water for Sources:
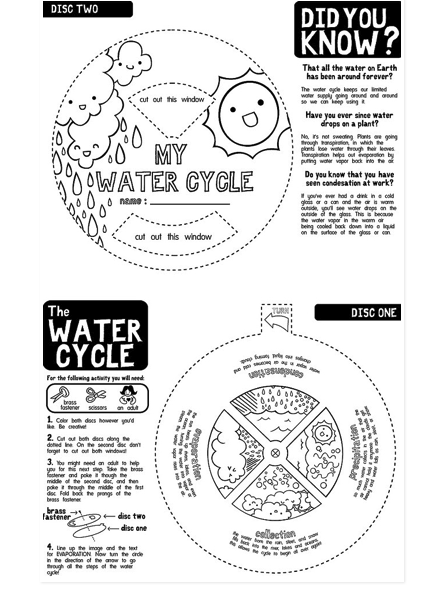
- http://www.youtube.com/watch?v=hehXEYkDq_Y - http://www.groundwater.org/kc/activity1.html - http://www.michfb.com/files/education/lesson_water.pdf - http://eisforexplore.blogspot.com/2012/04/water-cycle-wheel.html Power point for entire lesson Water Cycle in a bag: - 8 tablespoons - 8 plastic sandwich bags - Masking tape - 8 Sharpies - 8 water cycle worksheets Explanation of water cycle: - 24 Water Cycle worksheets Elaboration of the Water Cycle: - crayons for each student - 24 Water Cycle Wheels - 24 brass fasteners - 24 scissors Evaluation of the water cycle: - Story of the water droplet - Pencils |
Engage: 10 min
Have students watch the Bill Nye the science guy clip on water cycle
http://www.youtube.com/watch?v=hehXEYkDq_Y
After watching the video ask questions:
- Why do we need water? (ex: drink, grow plants, for animals)
- How might a farmer use water? (ex: irrigation, plant growth, production)
- Where does water come from? (ex: rain, rivers, lakes)
|
Explore: 15 min
Water Cycle in a bag: - Put students into 7 groups of 3 and 1 group of two. - Give each group a packet of materials (tablespoon, bag, tape) - Tell students to write their names at the top of the bag - Tell each group to put two table spoons of water into their bags - Someone from the group then blow air into the bag with their mouth and quickly zip up the bag - Have the students discuss in their groups the questions on the Water Cycle worksheet and come up with one answer for their group to each question. - Next tape the bag onto the window. |
|
||
|
Explain 20 min
- After the students have put the bag on the window have the students sit with their groups, have them bring their worksheets. - Go over the questions from the worksheet and have groups share their answers. - Tell students that they will be going back to look at their bags later on - Hand out the Water Cycle Worksheet to each student - As we go over the parts of the water cycle have the students fill out the blanks on the worksheet. Have them write down the definition under the blank. -Use the power point to explain the different parts of the water cycle. - As you go over the water cycle put the teacher water cycle worksheet on the doc-cam and fill it out with the students. - Questions are on the PowerPoint for each part of the cycle to ask the students |
|
||
|
Elaborate 20 min
- Hand out the Water Cycle Wheel - Have each student color the wheel (give them 10 min) - After students are done coloring show them where to cut and have students cut out their wheels - Next have the students put the fasteners through the top wheel and line it up with the bottom wheel and put the fastener through the middle of the bottom wheel. Have the students line up text and image for evaporation and turn the wheel to go through the water cycle. |
|
||
|
Evaluate 20 min
- Have the students go back to their bags on the window and write down what they now see - Bring the students together and discuss what they see and how it explains the water cycle. - Also discuss how it compares with how they answered their questions on the water in a bag worksheet. - Have the students return to their seats and write their story of the water droplet and how it goes through the water cycle. Have them write the story and the picture on the Tiny Droplet worksheet. |
|
||
Plans for Individual Differences
- lots of peer support and group work
- for writing the story give lots of “white space”, starters, helpful hits in writing (for dyslexic student)
ESL give starters and hints but not as much white space
- lots of peer support and group work
- for writing the story give lots of “white space”, starters, helpful hits in writing (for dyslexic student)
ESL give starters and hints but not as much white space
